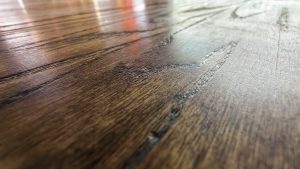
Imagine stepping into an old Victorian home, greeted by worn, scuffed, and scratched wooden floors. You might wonder: can sanding restore such heavily damaged floors? While sanding can revitalize minor imperfections, severely damaged floors require a bit more attention. The type of wood, depth of damage, and any necessary repairs all play a role in determining whether floor sanding alone can do the trick. Before diving into the sanding process, it’s essential to evaluate these factors carefully. They could determine whether it’s a straightforward fix or a more complicated restoration task.
Key Takeaways
- Floor sanding can restore the beauty of wooden floors by removing surface imperfections and old finishes.
- For deep gouges or scratches, wood filler or plank replacement may be required before sanding.
- Assessing structural integrity ensures the floor can handle sanding without further damage.
- For extensive damage, professional expertise might be necessary to achieve the best results.
- Sanding may not be enough for severely damaged floors, and additional repairs could be needed.
Understanding Floor Sanding
Floor sanding is a highly effective way to restore the appearance and functionality of damaged wooden floors. This process removes the surface layer of imperfections, scratches, and worn finishes, leaving behind a smooth, clean surface ready for refinishing.
Using specialized equipment like drum sanders and edge sanders, you gradually remove the top layers of the wood. Start with coarse-grit sandpaper to address deeper scratches and uneven areas. Progressing to finer grits ensures a smoother finish. Consistent pressure and steady movement are key to avoiding dips or gouges in the wood.
Additionally, each wood type has its own sanding requirements. Softer woods like pine need more delicate handling compared to hardwoods like oak, which are more forgiving. Proper sanding not only improves the floor’s look but also increases its durability, ensuring it lasts for many years.
Assessing the Damage
Before sanding, it’s important to evaluate the condition of your floor. Here’s how you can assess whether sanding is feasible or if additional repairs are needed:
- Surface Imperfections: Look for signs like deep scratches, gouges, or discoloration, particularly in areas where sunlight may have caused fading.
- Structural Issues: Check for warping, buckling, or loose boards. These problems could indicate underlying issues that sanding alone won’t address.
- Wood Thickness: Measure the remaining wood above the tongue-and-groove joint. If it’s less than 2mm thick, sanding could damage the floor.
- Moisture Content: Use a moisture meter to ensure the wood’s moisture level is between 6% and 9%. Too much moisture can cause issues during sanding.
Types of Wood Flooring
Understanding the type of wood flooring you have is crucial when determining how to approach sanding, as hardwood and softwood have different characteristics.
Hardwood vs. Softwood
Hardwood floors, like oak and maple, are known for their durability and can handle more extensive sanding, making them ideal for heavy damage restoration. Softwood floors, such as pine and cedar, are more affordable but more prone to scratches and dents. They require a gentler sanding approach because excessive sanding can weaken the wood.
If your floor is heavily damaged, hardwood will be easier to restore. However, softwood can also be revitalized with the right sanding tools and techniques, so it’s possible to bring even delicate floors back to life.
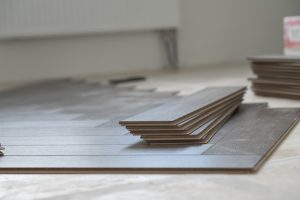
Engineered vs. Solid Wood
Engineered wood flooring consists of a veneer of real wood over plywood layers. It’s more stable and less affected by humidity changes, but sanding is limited due to the thin veneer. Solid wood, on the other hand, is milled from a single piece of wood, making it more durable and able to withstand multiple sanding sessions. If your floor is severely damaged and solid wood, you have more room to work with, but engineered wood may require more cautious sanding due to its limited thickness.
Sanding Techniques Explained
Getting the right sanding technique is essential for achieving a flawless finish. Here’s what you need to know:
- Starting Grit: Begin with coarse-grit sandpaper (around 36 or 40) for deeper scratches and stains. As you progress, move to finer grits (60, 80, 100) for a smooth finish.
- Sanding Direction: Always sand along the grain of the wood to prevent cross-grain scratches.
- Even Pressure: Apply consistent pressure to avoid creating dips or gouges in the wood.
- Dust Control: Constant cleaning during sanding will prevent dust from interfering with the finish. A vacuum with a HEPA filter can help reduce airborne particles.
Tools and Materials Needed
The proper tools are vital for a successful sanding project. Here’s what you’ll need:
- Drum Sander: Used for sanding large areas and removing the surface layer.
- Belt Sander: Great for corners and edges where the drum sander can’t reach.
- Detail Sander: Essential for tight spots and finishing touches.
- Sandpaper: Start with coarser grits (36-40) for deep damage, and finish with finer grits (100-120) for a smooth finish.
- Safety Gear: Dust masks, safety goggles, and ear protection are necessary for safety.
- Wood Filler: To repair deep gouges or missing sections.
- Floor Buffer: To polish the wood after sanding.
Benefits of Floor Sanding
Floor sanding can have a dramatic effect on your home’s interior. Here are the primary benefits:
- Restoration of Original Beauty: Sanding revives the natural grain and color of your wood, giving it a fresh, updated look.
- Improved Durability: By sanding and applying a protective finish, you enhance the floor’s resilience against future wear and tear.
- Increased Property Value: Well-maintained wooden floors are a major selling point and can increase the value of your home.
Proper sanding can breathe new life into worn floors, making them more visually appealing and long-lasting.
Potential Challenges and Limitations
While floor sanding is highly effective, there are challenges to consider, particularly for heavily damaged floors:
- Deep Scratches and Gouges: These may require wood filler or plank replacement before sanding.
- Structural Integrity: Warped or weakened boards can’t be fixed by sanding alone. These should be replaced or reinforced before proceeding.
- Moisture Issues: High moisture content can cause the wood to swell, leading to uneven sanding results.
Deep Scratches and Gouges
For severe damage like deep scratches or gouges, sanding alone might not be enough. Wood filler can be used to fill in these imperfections, but if the damage is extensive, you may need to replace certain planks. It’s crucial to assess the depth of the damage and determine whether fillers will work before attempting to sand.
Structural Integrity Concerns
If your wooden floor shows signs of rot or buckling, sanding won’t fix these underlying issues. Before sanding, inspect the floor carefully and repair any weak spots. Reinforce loose boards or replace damaged ones to prevent further problems.
Professional Vs DIY Sanding
Should you handle floor sanding yourself or hire a professional? Here’s what to consider:
- Equipment: Professionals use industrial-grade equipment that can handle heavy wear, which might be difficult to operate as a DIYer.
- Skill Level: Professionals have the expertise to achieve a flawless finish, while DIY sanding could result in uneven surfaces or mistakes.
- Time: DIY sanding takes more time and effort compared to professionals who can complete the job more quickly and efficiently.
If your floors are heavily damaged, hiring a professional may ensure the best outcome, especially if you’re dealing with deep scratches or complex repairs. However, if you’re comfortable with DIY projects and the damage is not too extensive, you can achieve satisfactory results with the right tools and knowledge.
Maintenance After Sanding
Once you’ve chosen between professional or DIY sanding and completed the process, focusing on maintenance becomes paramount to preserve your floors’ new appearance.
First, implement a regular cleaning routine. Use a soft-bristle broom or a microfiber mop to remove dust and debris daily. Avoid excessive water exposure; damp mopping should be minimal and only with pH-neutral cleaners specifically designed for wood floors.
Next, protect high-traffic areas using rugs or runners, ideally with non-slip backings to prevent movement and scratching. Rotate these periodically to guarantee even wear. Ascertain furniture has protective pads on legs to minimise indentations and scratches.
Control your indoor environment by maintaining stable humidity levels, ideally between 35-55%, to prevent wood from expanding and contracting. A humidifier or dehumidifier can help manage this as seasons change.
Frequently Asked Questions
How Long Does Floor Sanding Typically Take for a Heavily Damaged Floor?
When you’re dealing with a heavily damaged wooden floor, floor sanding typically takes longer than usual.
Expect it to last several days, depending on the extent of the damage and the floor’s size.
You’ll start by evaluating the condition of the wood.
Use a coarse grit sandpaper to remove deep scratches and gouges.
Progress to finer grits for a smooth finish.
Don’t rush; precision is key in restoring your floor’s integrity and appearance.
Can Floor Sanding Remove Deep Stains and Discolouration?
When it comes to deep stains and discolouration, floor sanding can often be your ace in the hole.
You’ll need to start by using a drum sander to remove the top layer, which holds most of the stains. Progressively using finer grit sandpaper guarantees a smooth finish.
It’s vital to be methodical, as uneven sanding could lead to further issues. After sanding, applying a quality stain or sealant helps in achieving a uniform look.
Is It Possible to Sand Engineered Wood Floors?
Yes, you can sand engineered wood floors, but proceed with caution.
Engineered wood has a thin veneer layer, usually 1/16 to 1/4 inch thick, so you can’t sand them as many times as solid wood.
Check the wear layer thickness first. Use a professional-grade sander and fine-grit sandpaper to prevent damage.
If the veneer is too thin, consider refinishing or replacing the flooring for best results.
Always guarantee proper maintenance.
What Are the Signs That a Floor Is Beyond Repair?
Just like a worn-out shoe that’s lost its sole, a floor beyond repair will show deep cracks, warping, or persistent water damage.
You should inspect for nails protruding, extensive rot, or if the wood feels spongy underfoot.
If the floorboards are too thin from previous sanding or sections are missing, it’s time to contemplate replacement.
Focus on these signs and you’ll know when restoration isn’t feasible and replacement is necessary.
How Many Times Can a Wooden Floor Be Sanded Before It’s Too Thin?
You can sand a wooden floor a limited number of times.
Typically, solid hardwood floors can be sanded 5-7 times, while engineered wood may allow for only 1-3 sandings due to the thinner veneer layer.
Always check the thickness of the wear layer before proceeding.
Monitor carefully for signs of excessive wear, such as nail exposure or splintering.
When it’s too thin, consider refinishing alternatives or replacement options.
Conclusion
To summarise, floor sanding can greatly enhance the appearance of damaged wooden floors, but it’s not a cure-all. In fact, around 70% of floors can be revitalised with sanding alone, while the rest may need additional repairs or plank replacement. Always assess the damage thoroughly. Don’t hesitate to seek professional help for severe issues, ensuring the best outcome. Remember, proper maintenance post-sanding will extend your floor’s longevity and keep it looking its best.