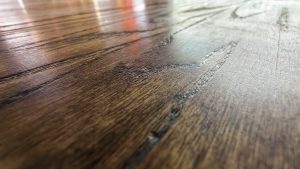
When you’re dealing with deep scratches and stains on your wooden floors, you might wonder if floor sanding is the solution you need. It’s true that sanding can significantly improve the appearance of surface-level imperfections, but what about those stubborn, deeper blemishes? The answer isn’t always straightforward. Factors like the depth of the scratch, the type of stain, and the wood’s condition all play a role in determining the effectiveness of sanding alone. Before you start the process, explore how different techniques and treatments might offer a more comprehensive approach to restoring your floors to their former glory.
Understanding Floor Sanding
Although often overlooked, understanding floor sanding is crucial for effectively addressing deep scratches and stains on your floors. Sanding isn’t just a superficial fix; it’s a transformative process that revitalizes your wood surfaces. By removing the damaged upper layer, you reveal a fresh, pristine layer beneath. This not only improves your floor’s appearance but also prepares it for refinishing and resealing, enhancing its durability and longevity.
One of the primary sanding benefits is its adaptability to various wood types. Whether dealing with the dense grain of oak or the softer nature of pine, sanding techniques can be adjusted to accommodate each wood type’s unique properties. For instance, harder woods may require coarser sandpaper to efficiently remove imperfections, while softer woods demand a gentler touch to prevent additional damage.
Furthermore, sanding allows for a consistent surface, ensuring even absorption of stains and finishes. This is particularly important when dealing with deep scratches and stains, as it ensures that repairs blend seamlessly with the existing floor.
Types of Scratches and Stains
Scratches and stains on wood floors can vary significantly in depth, severity, and cause, each requiring a tailored approach for effective treatment.
Light scratches often occur on the surface layer of the wood, typically resulting from everyday activities like moving furniture or pets’ claws. These are superficial and don’t penetrate deeply into the wood, making them relatively easy to address through minor refinishing or polishing techniques.
Surface stains, on the other hand, are typically the result of spills or water exposure that hasn’t been promptly cleaned, leaving discolouration on the wood’s uppermost layer. These stains, while not deeply ingrained, can still alter the floor’s appearance significantly.
Identifying the type of stain is crucial, as certain stains might be oil-based, while others could be water-based, each requiring specific cleaning solutions or techniques.
In contrast, deeper scratches and stains penetrate beyond the surface, affecting the wood’s integrity and requiring more intensive interventions, such as sanding.
Understanding the difference between light scratches, surface stains, and their more severe counterparts will help you determine the most effective restoration approach, ensuring your wood floors maintain their aesthetic appeal and structural integrity.
Floor Sanding Process Overview
Sanding is a critical step in restoring wood floors, especially when dealing with deep scratches and stains. First, you need to understand the specific wood type you’re working with, as different woods respond uniquely to sanding techniques.
Begin by assessing the depth of the scratches and the severity of the stains. For hardwoods like oak or maple, you might start with a coarser grit sandpaper to effectively remove deeper damage, then gradually transition to finer grits to smooth out the surface.
You’ll want to maintain even pressure and consistent movement to avoid creating uneven surfaces. The sanding process typically involves multiple passes, each time reducing the grit size to refine the finish.
With softer woods such as pine, you’ll need a gentler approach, using finer sandpapers from the start to prevent over-sanding.
Equipment and Tools Required
To effectively tackle floor sanding, you’ll need a well-equipped toolkit tailored to the task. Start with sanding machines, which are indispensable for achieving a smooth, even finish. A drum sander is essential for large, flat areas, while an edge sander targets corners and tight spots with precision. Both machines are crucial for efficiently removing deep scratches and stains from wooden floors.
Choose the right grit levels for your sandpaper, as this determines how much material is removed during sanding. Begin with a coarse grit, like 36 or 40, to strip away the damaged surface layer. As you progress, transition to medium grit levels such as 60 to 80, which help refine the surface and prepare it for finer sanding stages. Finally, use a fine grit, like 100 to 120, to achieve a smooth finish, ready for sealing or refinishing.
Don’t overlook safety equipment. Dust masks, safety goggles, and ear protection are essential for safeguarding yourself against airborne particles and noise.
Additionally, a vacuum or dust extractor is vital for maintaining a clean workspace, ensuring that your sanding efforts remain effective and your surroundings are free from debris.
Techniques for Deep Scratches
When you’re dealing with deep scratches on wooden floors, precision and technique are paramount. You need to approach scratch repair with a methodical mindset. Start by assessing the scratch’s depth and length to determine the right sanding techniques. Use a coarse-grit sandpaper, around 40 to 60 grit, to gently sand the scratched area. This initial sanding will remove the top layer and level the surface.
Here’s a concise guide to tackle deep scratches effectively:
- Initial Sanding: Use coarse-grit sandpaper to sand along the wood grain. This helps to even out the scratch without damaging the surrounding area. Avoid circular motions to prevent further marks.
- Progressive Sanding: Switch to a medium-grit sandpaper (80 to 100 grit) to smooth the surface further. This step is crucial for blending the repair seamlessly with the rest of the floor.
- Finish Sanding: Employ a fine-grit sandpaper (120 to 150 grit) for the final pass. This refines the surface, preparing it for finishing.
- Inspection and Cleaning: After sanding, inspect the area for any remaining imperfections. Clean the dust thoroughly with a vacuum and tack cloth to ensure a dust-free surface for the next steps.
Precision in each step ensures a professional and lasting repair.
Tackling Persistent Stains
With persistent stains on wooden floors, a strategic approach is essential to restore their original beauty.
First, assess the type of stain you’re dealing with—water, oil, or pet stains each require specific treatments. For effective stain removal, begin with a gentle surface treatment. Lightly sand the stained area using fine-grit sandpaper, ensuring you follow the wood grain to avoid additional damage. This process helps lift the stain from the surface.
Once sanded, apply a stain-specific cleaner. For water stains, a mixture of vinegar and water can be effective. Oil stains may require a solvent-based cleaner, while pet stains often need an enzymatic cleaner to neutralize odors and discolouration. Apply the cleaner with a soft cloth, working it into the wood gently.
After the stain removal process, allow the floor to dry completely. Assess if further sanding is necessary to blend the treated area with the rest of the floor.
Finish with a protective sealant to prevent future staining. By following these steps, you can tackle persistent stains effectively and maintain the floor’s integrity, ensuring it retains its aesthetic appeal.
Limitations of Floor Sanding
While tackling persistent stains on wooden floors can restore their luster, it’s important to recognize the limitations of floor sanding. Sanding isn’t a universal remedy for all flooring issues. Its effectiveness diminishes when dealing with certain conditions, particularly deep scratches and other complex damages.
Here’s what you should consider:
- Depth of Damage: Floor sanding can effectively address surface-level imperfections, but deep scratches often penetrate beyond the sandable layer. This means that sanding mightn’t fully eliminate these flaws without risking structural integrity.
- Thickness of Floorboards: Each sanding process removes a layer of wood, which is a critical factor if your floorboards are thin. Over-sanding can lead to a weakened floor that may require replacement rather than restoration.
- Existing Floor Finish: Some finishes are designed to penetrate deeply into the wood. Sanding may not completely remove these finishes, potentially leaving remnants that affect the final appearance and adhesion of new finishes.
- Inherent Wood Characteristics: Variations in wood grain and colour can become more pronounced after sanding, sometimes highlighting imperfections rather than concealing them.
Understanding these sanding limitations helps you make informed decisions about your floor restoration approach.
Alternative Restoration Methods
Exploring alternative restoration methods can be crucial when traditional floor sanding isn’t suitable for addressing deep scratches and stubborn stains. One effective approach is utilizing chemical treatments. These treatments involve applying specific compounds designed to penetrate and lift stains without damaging the wood.
Products like oxalic acid can be particularly effective for removing dark water stains or iron marks. However, it’s essential to select the right chemical that matches your floor’s finish and type to avoid unintended discolouration or further damage.
Refinishing options also offer viable solutions. Instead of sanding the entire floor, you can focus on refinishing the affected areas. This process involves stripping the existing finish, treating the scratches or stains, and applying a new coat of finish to restore the wood’s appearance.
You might consider using a tinted finish to help mask any residual imperfections. This can be a more economical and less labor-intensive alternative to full sanding.
You should ensure that any refinishing materials or chemical treatments used are compatible with your floor’s existing finish. Understanding these alternatives allows you to make informed decisions, ensuring the longevity and beauty of your flooring without relying solely on sanding.
Professional vs. DIY Sanding
When it comes to deciding between professional and DIY floor sanding, understanding the intricacies of each option is crucial. Both paths have distinct implications for cost comparison and time investment. Here’s a structured breakdown to guide your decision:
- Cost Comparison: Hiring professionals typically involves higher upfront costs due to labor and expertise. However, they come equipped with industrial-grade tools and offer guaranteed results.
DIY sanding can save you money initially but requires renting or purchasing equipment and materials, which can add up.
- Time Investment: Professionals can complete the job efficiently due to experience and specialized tools, minimizing disruption to your routine.
DIY sanding often demands a significant time commitment, especially for first-timers learning the process and managing unexpected issues.
- Skill Level Required: Professional sanding ensures precision and quality, essential for dealing with deep scratches and stains.
DIY enthusiasts must be prepared for a steep learning curve, as improper sanding can lead to uneven surfaces or further damage.
- Risk Factors: Professionals mitigate risks of sanding errors and ensure adherence to safety standards.
Conversely, DIY sanding carries the risk of mistakes or injuries if safety precautions aren’t followed diligently.
Ultimately, weigh these factors to decide which approach aligns with your priorities.
Maintenance After Sanding
After deciding between professional and DIY sanding, it’s important to focus on maintenance strategies to preserve your floor’s new finish. Post sanding care involves several crucial steps to ensure longevity and appearance.
First, apply a high-quality sealant to protect the wood from moisture and wear. Choose products designed for your specific wood type, as they provide optimal floor protection.
After sealing, establish a routine cleaning regimen. Use microfiber mops or soft-bristled brooms to avoid scratching the surface.
It’s essential to control the indoor environment. Maintain humidity levels between 35-55% to prevent wood from expanding or contracting. Consider using humidifiers or dehumidifiers as needed.
Protect high-traffic areas with rugs or runners, but ensure they’ve non-slip padding to prevent accidents. Avoid dragging furniture across the floor. Instead, lift or use protective pads under furniture legs.
Regularly inspect your floor for signs of wear. If you notice dullness or minor scratches, lightly buff the area and apply a refresher coat of finish.
Frequently Asked Questions
How Does Humidity Affect the Outcome of Floor Sanding?
Humidity levels impact sanding techniques by causing wood to expand or contract. High humidity leads to uneven surfaces, affecting the finish. You should monitor and adjust techniques accordingly for optimal results, ensuring a smooth, professional outcome.
Can Floor Sanding Be Performed on Engineered Wood Floors?
You can sand engineered wood floors using specialized sanding techniques, ensuring proper grit selection, controlled pressure, and consistent movement. Check the veneer thickness to avoid damage. Always consult manufacturer guidelines for best results, maintaining durability and aesthetic appeal.
Is It Safe to Sand Floors With a History of Pest Infestations?
When sanding floors with a pest infestation history, ensure pest control measures are in place first. Treat the wood thoroughly to prevent recurrence. Sanding can then proceed safely, but continuous monitoring for pest signs is essential.
Are There Eco-Friendly Options for Floor Sanding Products?
You can definitely find eco-friendly floor sanding products. Use sustainable materials like reclaimed wood dust, and opt for non-toxic finishes. These choices minimize environmental impact while ensuring a safe, high-quality finish on your floors.
How Long Should One Wait Before Walking on Freshly Sanded Floors?
When it comes to walking on freshly sanded floors, patience is a virtue. Allow the drying time dictated by your sanding technique—typically 24 to 48 hours—so the finish sets properly, ensuring durability and longevity.
Conclusion
Floor sanding effectively tackles surface imperfections but often falls short with deep scratches and stubborn stains. Did you know that up to 30% of wood floors require additional treatments beyond sanding for complete restoration? Understanding the extent of damage is crucial. While sanding reduces the appearance of flaws, integrating chemical treatments or alternative methods can enhance results. Always consider professional assessments over DIY efforts to ensure your floor remains both functional and aesthetically pleasing post-restoration.