While you might worry about the practicality of laying vinyl over tile, it’s entirely feasible with the right preparation.
You’ll need to assess the condition of your existing tiles—ensuring they’re level and firmly attached—before you begin. Choosing the right type of vinyl is crucial, as some varieties are better suited for this purpose than others.
You’ll also need to consider the specific preparation steps, such as cleaning and possibly levelling the tile surface, to ensure a successful installation. This process may present challenges, but understanding them beforehand can help you navigate the project more smoothly.
Let’s explore how you can achieve a flawless finish with your new flooring, highlighting the steps and tips that will aid in a seamless transition.
Key Takeaways
– Vinyl flooring can be installed over tile, provided the tile is stable, level, and damage-free.
– Pre-installation preparation, including cleaning and levelling tiles, is crucial for successful vinyl adhesion.
– Selection of vinyl type (sheets, planks, tiles) and thickness is important to bridge gaps and complement home décor.
– Addressing potential challenges, like moisture and uneven surfaces, ensures a durable and aesthetically pleasing finish.
Assessing Your Tile Condition
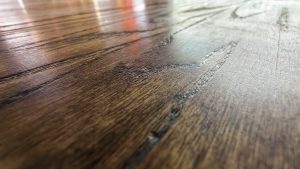
Before considering laying vinyl flooring over tile, it’s crucial to assess the condition of your existing tiles to ensure they’re stable, level, and free from significant cracks or damage. You need to meticulously inspect for any loose tiles, as these can cause your vinyl flooring to shift or bubble, compromising its durability. Tile durability plays a pivotal role in whether your vinyl flooring will last without issue.
First, check the level of the tile floor. Vinyl flooring requires a smooth, flat surface to adhere properly. Use a level to identify any high or low spots. Minor unevenness might be manageable with the right preparation, but significant discrepancies could necessitate additional steps, such as applying a self-levelling compound.
Moisture concerns are paramount, especially in areas like bathrooms or kitchens. Excess moisture trapped between the vinyl and tile can lead to mould or mildew growth. Conduct a moisture test by taping down a plastic sheet overnight and checking for condensation in the morning. If moisture is present, you’ll need to address this issue before proceeding.
Choosing the Right Vinyl
Selecting the right vinyl flooring involves understanding its types, durability, and compatibility with your existing tile surface. It’s crucial to consider vinyl thickness and style variety to ensure a successful installation. Thicker vinyl can bridge minor gaps and imperfections in the tile, providing a smoother surface. Generally, a minimum thickness of 4mm is recommended for laying over tile, but going thicker can enhance both the feel underfoot and sound absorption.
Vinyl flooring comes in sheets, planks, and tiles, each offering a unique set of benefits. For instance, luxury vinyl planks (LVP) mimic the look of hardwood and are known for their durability and ease of installation. Meanwhile, vinyl sheets might offer a more seamless look, ideal for larger areas or where moisture resistance is a priority. The style variety available in vinyl flooring is vast, ensuring you can find an option that complements your home’s décor.
When choosing vinyl, also consider the wear layer’s thickness, as it directly impacts the floor’s durability. A thicker wear layer stands up better to foot traffic and can protect the design layer from fading and scratches, keeping your floor looking new for longer.
Preparation Steps
How do you ensure your existing tile surface is ready for vinyl flooring installation? The key to a successful installation lies in thorough preparation. Before you proceed, it’s crucial to prepare the tile surface meticulously to ensure the vinyl adheres properly and lasts for years. Here’s how to prepare your tile surface effectively:
- Surface Cleaning: Start by removing any dirt, grime, or oil from the tile surface. Use a high-quality cleaner that won’t leave residue behind. Ensure the floor is completely dry before moving to the next step. This step is crucial as any leftover debris can cause the vinyl to not adhere correctly or even lead to uneven surfaces.
- Moisture Check: Perform a moisture test on the tile floor, especially if it’s in a moisture-prone area like a bathroom or basement. Excessive moisture can damage vinyl over time, so it’s vital to address any issues before installation.
- Levelling: Check for any uneven tiles or grout lines. If your tile floor isn’t even, consider applying a levelling compound to smooth out the surface. This ensures a flat base for the vinyl flooring.
- Repair Damages: Inspect the tile for any cracks or damages. Repair these imperfections to prevent them from affecting the vinyl flooring.
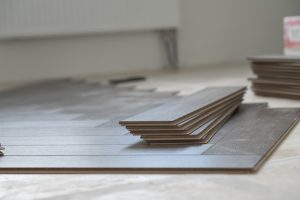
Installation Process
Once your tile surface is properly prepared, it’s time to embark on the installation process of your vinyl flooring. You’ll need to decide on underlayment options first. A thin, foam layer can be a great choice, providing a smooth surface for the vinyl and helping to level any minor imperfections in the tile below. It also adds an extra barrier for moisture and can enhance the floor’s soundproofing qualities.
Next, gather your installation tools. Essential items include a utility knife for cutting the vinyl to size, a notched trowel for spreading any adhesive (if you’re using glue-down vinyl planks or tiles), a roller to ensure firm adhesion, and a tape measure for accurate layout planning. Don’t forget spacers if you’re aiming for a floating vinyl floor installation; these will ensure you maintain an even expansion gap around the room’s perimeter.
Begin laying your vinyl from the centre of the room, working outwards. This method helps to ensure an even layout and reduces the risk of needing to trim significant amounts off the planks or tiles at the room’s edges. If you’re using click-lock vinyl, make sure each piece is securely connected to its neighbour, using gentle taps from a rubber mallet if necessary.
Potential Challenges
While laying vinyl flooring over tile can streamline room renovations, you’ll likely encounter several challenges, including addressing uneven tile surfaces and ensuring a secure bond. These hurdles can impact both the installation process and the longevity of your flooring.
Here are the key challenges to consider:
- Uneven Tile Surfaces: Tiles may not always lay flat or be perfectly level, leading to dips and rises. Vinyl flooring requires a smooth, flat surface for installation, so you’ll need to fill in grout lines or level the entire floor to avoid imperfections that could telegraph through the vinyl.
- Moisture Problems: Tiles, particularly in areas like bathrooms and kitchens, can trap moisture underneath. When covered with vinyl, this moisture has nowhere to escape, potentially causing mould or mildew problems. It’s crucial to address any moisture issues before proceeding.
- Height Adjustments: Adding vinyl flooring on top of tile will raise the floor’s height, which might require adjustments to door frames and thresholds. This can add unexpected work and complications to your project.
- Ensuring a Secure Bond: Vinyl flooring needs to adhere well to the surface beneath it. Tiles that are glossy or have a textured surface can inhibit adhesion, making it necessary to use additional products or techniques to ensure the vinyl sticks properly.
Tackling these challenges head-on will help ensure a successful installation and durable finish.
Frequently Asked Questions
How Does the Thickness of the Vinyl Flooring Affect the Transition Areas Between Rooms?
The thickness of your vinyl flooring significantly impacts room acoustics and installation cost, particularly in transition areas between rooms. Thicker vinyl improves sound dampening but may require additional work and expense to ensure smooth transitions.
Can Underfloor Heating Systems Impact the Longevity or Performance of Vinyl Flooring Installed Over Tile?
Imagine your vinyl flooring as a delicate flower under the sun. Heating compatibility and temperature effects are crucial; underfloor heating can shorten its life or affect performance if not carefully considered and properly installed.
Are There Specific Types of Cleaning Products or Methods to Avoid on Vinyl Flooring Installed Over Tile to Prevent Damage?
You should avoid abrasive cleaners and harsh chemicals on vinyl flooring. Stick to a low cleaning frequency and gentle products. Polishing techniques must be suitable for vinyl to prevent damage and maintain its appearance.
How Does the Age of the Existing Tile Influence the Decision to Install Vinyl Flooring Over It?
Older tiles can be a double-edged sword; their durability might seem like a plus, but it often brings installation challenges for new flooring. The age affects adhesion and levelness, crucial for a smooth, lasting finish.
In What Ways Can the Grout Lines of the Existing Tile Floor Become Visible Through the Vinyl Flooring Over Time, and How Can This Be Prevented?
Over time, grout lines may show through your vinyl flooring due to settling or wear. By using a levelling compound for grout preparation, you’ll ensure a smoother surface that prevents these outlines from appearing.
Conclusion
Absolutely, you can transform your space by laying vinyl flooring over tile, making it the eighth wonder of the world!
But remember, it’s like conducting a symphony; every detail matters. Start by ensuring your tiles are as level as the horizon.
Choose your vinyl as if selecting the crown jewels. Prepare the surface as meticulously as a surgeon.
When installing, precision is your mantra. Beware, challenges lurk like dragons, but with this guide, you’ll slay them effortlessly, achieving a realm of unmatched beauty.